An Alaskan expedition rewards careful planning and punishes vague optimism. The more remote the trip, the more your decisions about timing, access, weather, and contingency planning matter.
If you are organizing a first expedition, the usual questions arrive quickly: When should you go? Which part of Alaska fits your goals? How much should you budget before costs start expanding in every direction? And how much structure is enough before a flexible adventure turns into a preventable problem?
Those are reasonable questions because Alaska is not a single travel product. It is a large, varied landscape with very different weather windows, access constraints, licensing rules, and logistics depending on whether your trip centers on fishing, hunting, wildlife viewing, or general backcountry travel. Official trip-planning resources from the National Park Service’s Alaska pages, the National Weather Service Alaska region, and the Alaska Public Lands map resources are useful starting points because they keep the discussion anchored in conditions, access, and safety rather than fantasy itineraries.
This guide gives you a practical framework for planning: define the expedition type, choose the best-fit season and region, build a budget that reflects real tradeoffs, and draft an itinerary with enough structure to be useful and enough flexibility to absorb weather, transport changes, and field realities. If you want more trip ideas after this article, the site’s blog and services pages are the next logical stops.
Define The Expedition Before You Price It
The first planning mistake is trying to budget or schedule a trip before defining what kind of expedition it actually is. “Alaska trip” is too broad to be useful. A road-accessible salmon trip, a fly-out moose hunt, and a lodge-based mixed-activity week may all happen in Alaska, but they operate on different cost structures, gear needs, and risk profiles.
Your first decision criteria should be these four variables:
- Primary objective: fishing, hunting, sightseeing, photography, or a mixed wilderness trip.
- Access model: road-based, boat-based, rail-supported, or fly-in/fly-out.
- Support level: fully guided, semi-guided, lodge supported, or self-directed.
- Complexity tolerance: how much weather delay, remote travel, gear handling, and decision load you are prepared to manage.
If you only remember one planning principle, make it this: choose the simplest trip structure that still delivers the experience you actually want. Many first-time visitors assume the most remote option is automatically the best fit. Often it is simply the most expensive way to discover that the basics were not settled first.
Key Terms That Clarify The Planning Conversation
Before moving further, it helps to define a few terms that get used loosely in expedition planning:
- Road-accessible: a trip where the primary fishing, hunting, or touring activity can be reached from the highway system or a developed hub without bush-plane support.
- Fly-out: a trip that depends on a charter or bush flight to reach the field area. This often increases remoteness, cost, and weather sensitivity.
- Guided: a trip where a professional guide or outfitter manages a meaningful part of navigation, safety, logistics, or field execution.
- Buffer day: a day with no mission-critical transfer or activity, preserved to absorb delays, fatigue, or weather changes.
- Contingency budget: money intentionally held back for changes you cannot predict precisely but should expect in principle.
These definitions matter because planning failures often begin with language failures. A traveler says “remote but not too complicated” or “guided enough” and assumes everyone means the same thing. Usually they do not. A few precise terms early in the process prevent a lot of expensive translation later.
Reasonable Default Options By Traveler Type
| Traveler type | Best-fit expedition style | Main advantages | Watch for |
|---|---|---|---|
| First-time Alaska angler | Guided or lodge-supported summer fishing trip | Clear logistics, local knowledge, lower planning burden | Peak-season pricing and limited availability |
| Experienced outdoors traveler | Road-accessible basecamp with local day excursions | More independence, easier cost control | Need for route discipline and weather flexibility |
| Hunter focused on a specific species | Guide-led or transport-supported hunt tied to a clear area and season | Better regulatory alignment, stronger field logistics | Licensing, tag, transport, and meat-handling complexity |
| Family or mixed-interest group | Lodge or hub-based itinerary with fishing, sightseeing, and day trips | Broader appeal, safer default, simpler contingency planning | Trying to overpack the schedule |
Choose The Right Time And Region
Alaska planning is largely an exercise in matching goals to season. Summer offers the broadest access and the easiest conditions for many travelers, but it is also the busiest planning window. Shoulder seasons can provide fewer crowds and a different experience, but they demand more caution around daylight, transport reliability, and weather variability. The best time depends less on a generic calendar and more on what your expedition is designed to accomplish.
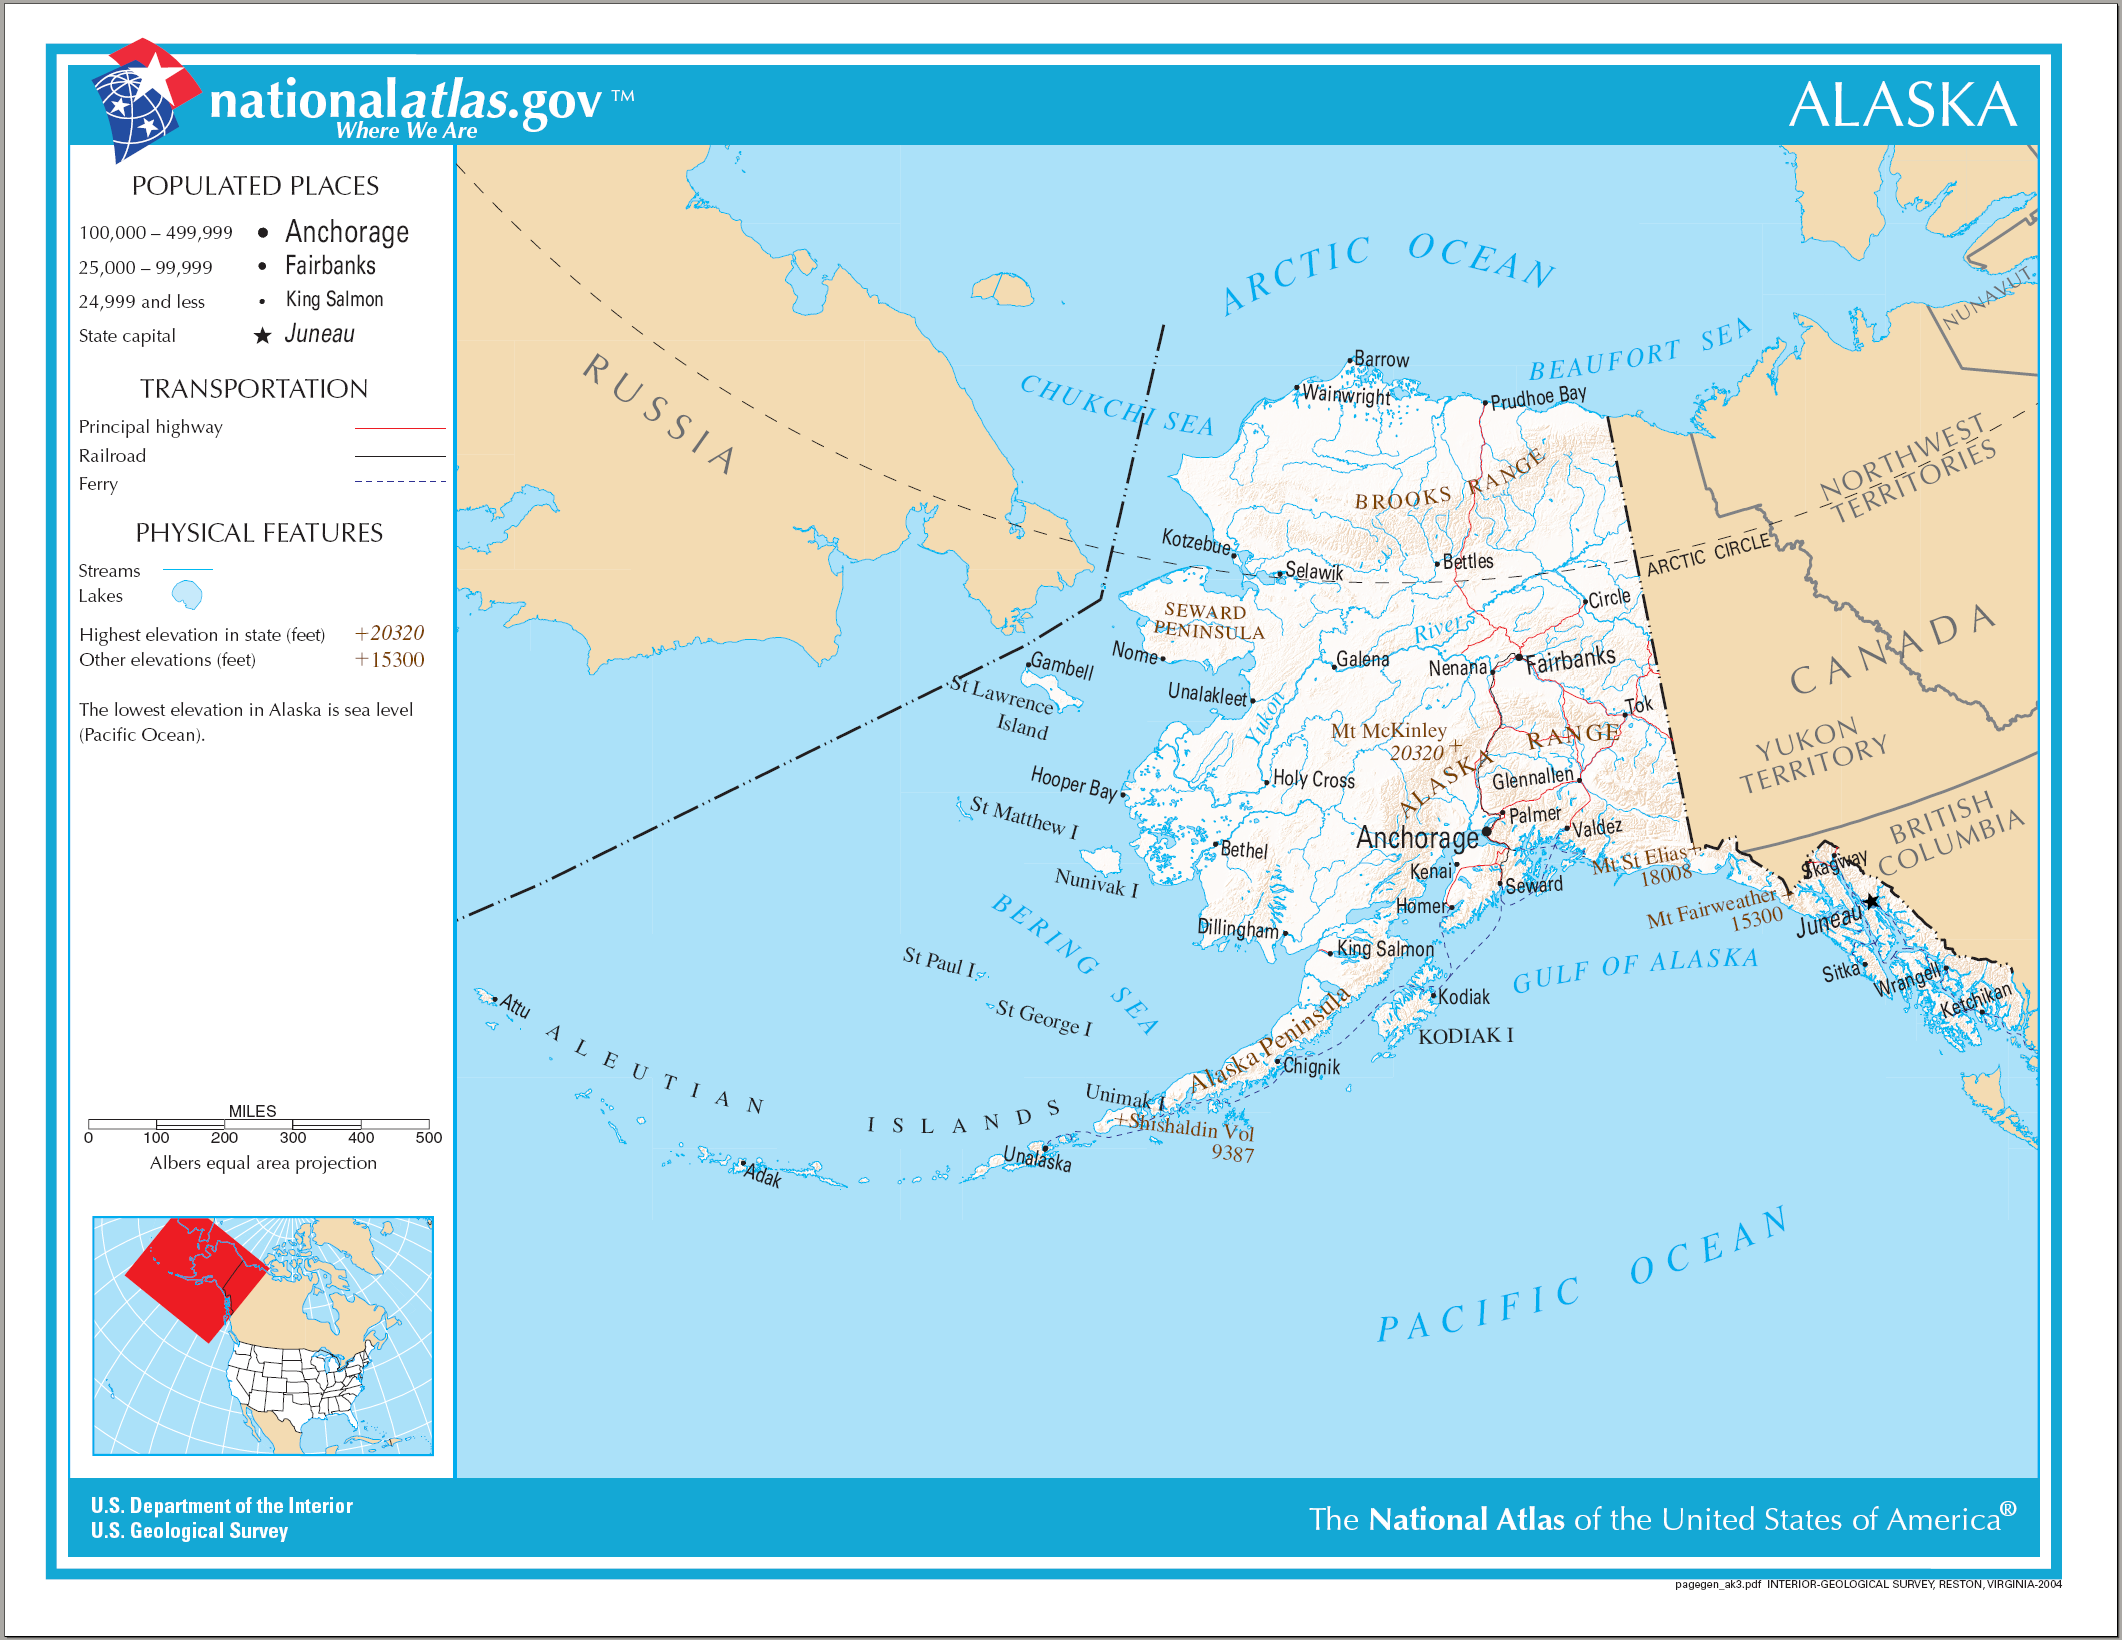
A general map is useful at this stage because region selection changes almost everything else: flight routing, transfer time, species options, road access, weather patterns, and the amount of contingency you need. It is a planning tool, not a navigation substitute. Once you pick a region, move to detailed local maps and area-specific guidance.
Season And Region Selection Guide
| Planning window | Best fit for | Advantages | Constraints |
|---|---|---|---|
| Late spring to early summer | General sightseeing, early fishing preparation, lighter crowd periods in some areas | Longer daylight, fresh season energy, easier mixed-itinerary design | Variable weather and location-specific fishing timing |
| Mid to late summer | Most fishing-focused expeditions and first-time visitors | Broad access, strong service availability, easier logistics | Higher demand, earlier booking pressure, premium pricing |
| Early fall | Hunting-focused trips and travelers prioritizing quieter conditions | Distinct wildlife activity, strong visual appeal, lower congestion in some areas | Shortening daylight, colder weather, tighter error margin |
| Late fall to winter | Experienced travelers with a specific winter objective | Unique scenery, snow-based activities, fewer crowds | Complex weather, transport disruptions, specialized gear needs |
For fishing and hunting decisions, regulations are not background reading; they are part of the planning sequence. The Alaska Department of Fish and Game sport fishing resources and the department’s hunting resources should be checked before you lock in your target area, not after. Species timing, permits, reporting requirements, and local rule changes can alter whether a destination is your best fit.
How To Pick A Region Without Overcomplicating It
A simple decision path helps:
- Pick the primary objective first: salmon fishing, halibut chartering, moose hunting, bear viewing, float travel, or a broad wilderness sampler.
- Choose the maximum complexity you can comfortably manage: road-based, boat-supported, or fly-out.
- Check whether the season, species, and regulations line up with that region.
- Only then compare specific outfitters, lodges, or transfer plans.
This order matters because region-first planning can look efficient while hiding the real issue: a destination may be beautiful and famous, but still be the wrong operational fit for your group. The best fit depends on your objective, not on how often the location appears in other people’s stories.
Suggested Booking Timeline
Many expedition problems are not really field problems. They are late-planning problems that reveal themselves in the field. A practical timeline helps keep decisions in the right order:
- 6 to 12 months out: choose the primary objective, season, region, and trip structure; shortlist outfitters or access models; begin deposit planning.
- 3 to 6 months out: confirm flights, lodging, local transfers, core equipment gaps, and license or permit requirements.
- 4 to 8 weeks out: review updated regulations, finalize packing systems, confirm baggage limits, and document the contingency plan.
- 1 week out: recheck forecasts, operator communications, maps, documents, and transfer timing.
The point of a timeline is not bureaucracy for its own sake. It is sequencing. The right decision made too late can still become the wrong operational outcome.
Budgeting And Costs: Build The Framework Before You Shop
Budgeting an Alaskan expedition is easier when you treat costs as a system instead of a headline number. Travelers often compare outfitter rates and miss the surrounding expenses that make the trip materially more expensive: in-state transfers, bush flights, baggage fees, licenses, cold-weather clothing, charter deposits, gear freight, and post-trip handling for fish or game.
The budget question is not “What does an Alaska expedition cost?” The better question is “Which trip design keeps the total cost inside my acceptable range while protecting the experience I care about most?”
Major Cost Buckets To Plan For
| Budget category | Why it matters | Typical pressure level | Control strategy |
|---|---|---|---|
| Travel to Alaska | Airfare and luggage policies can shift the budget early | Medium to high | Book early, compare baggage rules, avoid oversize surprises |
| In-state transport | Bush flights, charters, ferries, and vehicle rental drive variance | High | Choose the simplest access model that fits the goal |
| Guide or lodge fees | Often the largest visible line item | High | Compare what is included, not just the headline rate |
| Licenses, tags, and permits | Mandatory and objective-specific | Low to medium | Confirm current requirements before booking supporting travel |
| Clothing and equipment | Cheap gear decisions often create expensive field problems | Medium | Rent or borrow specialized items when practical |
| Contingency reserve | Weather and transport changes are not rare edge cases | Medium | Hold back 10 to 15 percent of the total trip budget |
One reliable budgeting rule is that access complexity usually matters more than almost any other variable. A road-accessible expedition can still be excellent. A fly-out itinerary can be extraordinary. The difference is that the second option introduces more transport cost, more schedule sensitivity, and fewer low-cost recovery paths if something changes.
Pros And Cons Of The Three Most Common Trip Structures
1. Road-accessible expedition
Pros: simpler logistics, better budget control, easier resupply, lower disruption if weather changes part of the plan.
Cons: less remote feel, more competition for popular areas, fewer “once in a lifetime” story points if that matters to your group.
2. Lodge-based expedition
Pros: planning is consolidated, meals and local expertise may be included, support level is usually clearer.
Cons: higher package cost, less flexibility if you want to self-direct, variable inclusions between operators.
3. Fly-out or bush-plane-supported expedition
Pros: access to remote country, strong wilderness feel, potentially better fit for specialized hunting or fishing goals.
Cons: higher cost, weather delays, stricter weight management, higher consequences if planning details are weak.
The reasonable default for many travelers is not the cheapest trip and not the most ambitious trip. It is the one where the cost structure stays legible. If you cannot explain what is included, what is extra, what triggers a schedule change, and what the fallback plan is, the budget is not finished yet.
Budgeting Tips That Hold Up Well
- Price the whole system, not just the lodge or guide rate.
- Ask for included and excluded items in writing before you pay deposits.
- Reserve contingency funds for weather delays, baggage issues, or extra overnight stays.
- Plan meat, fish, or trophy handling early if your trip includes harvest.
- Keep gear purchases disciplined. Alaska is demanding, but this is not a license for panic-buying every catalog page.
Build An Itinerary That Can Survive Real Conditions
Strong itineraries are specific enough to coordinate people, transport, and supplies, but flexible enough to absorb field conditions. Overplanned Alaska itineraries often fail in predictable ways: transfers are too tight, weather assumptions are too optimistic, and every day is treated as if it will begin exactly on schedule.
A good itinerary answers five questions:
- Where do we enter and exit the state?
- What is the primary activity each day?
- What is the backup if weather or transport changes?
- Which day carries the most logistical risk?
- How much recovery time exists before the return flight home?
Sample Itinerary 1: First-Time Summer Fishing Base
Best fit for: anglers who want a strong Alaska experience with manageable complexity.
- Day 1: Arrive in Anchorage or regional gateway, confirm baggage, overnight near transfer point.
- Day 2: Move to lodge or road-based fishing hub, gear check, briefing, early rest.
- Days 3-5: Guided fishing days with one lighter evening kept intentionally unscheduled.
- Day 6: Optional final fishing day or weather buffer.
- Day 7: Return transfer with enough margin before onward travel.
This is a strong first-trip structure because it concentrates the main activity while leaving room for delays or adjustments.
Sample Itinerary 2: Hunting-Focused Expedition With Transport Support
Best fit for: hunters planning around a specific season, area, and regulatory framework.
- Day 1: Arrival, final document review, confirm licenses, tags, and baggage weights.
- Day 2: Meet transporter or guide, repack into field loads, overnight near departure point.
- Days 3-8: Field period with daily weather review and a documented extraction plan.
- Day 9: Return from field, begin meat or equipment handling process.
- Day 10: Recovery and outbound travel buffer.
The key improvement many hunters can make is adding margin after the field period. That extra day may look inefficient on paper. In practice, it is often the most rational day in the schedule.
Sample Itinerary 3: Mixed Wilderness Sampler
Best fit for: couples, families, or small groups who want variety without pretending every person has identical priorities.
- Day 1: Arrival and orientation.
- Day 2: Scenic transfer and local wildlife or glacier viewing.
- Day 3: Guided fishing charter or float excursion.
- Day 4: Light activity day with local exploration or rest.
- Day 5: Optional second guided day or flexible weather buffer.
- Day 6: Return to departure hub.
This format works because it avoids stacking every expensive activity back to back. It also gives the group one day to adjust, recover, or simply appreciate being there without racing the schedule.
Packing And Readiness Checklist
Alaska packing should follow conditions, activity, and access method. The purpose is not to bring everything. It is to bring the right system: layers that stay functional in wet and cold conditions, footwear that matches the terrain, and documents that are easy to access when you are tired and moving through transfers.
Core Checklist
- Travel documents, identification, confirmations, and emergency contacts stored both digitally and on paper.
- Weather-capable layers: base, insulating, waterproof outer shell, spare socks, gloves, and headwear.
- Activity-specific gear checked against weight limits and luggage rules before departure.
- Licenses, permits, tags, and area-specific regulation notes if fishing or hunting is involved.
- Waterproof storage for phones, maps, satellite device information, and critical electronics.
- Medication, first-aid basics, and a simple field repair kit for the gear most likely to fail.
- Post-trip handling materials if you expect to transport fish, meat, or antlers.
One of the more expensive planning mistakes is packing for imagined heroics instead of the actual trip design. If the expedition is lodge supported, pack for that structure. If it is fly-out, weigh every category with discipline. If it is road based, use that advantage. The goal is readiness, not theater.
Final Decision Path
When the options start to blur together, reduce the decision to a short path:
- Define success in one sentence.
- Choose the season that best supports that goal.
- Select the region and access model with the fewest unnecessary complications.
- Price the full system, including contingency.
- Build an itinerary with at least one meaningful buffer day.
- Confirm regulations, maps, and weather resources shortly before departure.
The best expedition plans usually look slightly conservative on paper. That is not a weakness. It is what leaves room for the part you cannot control: weather, wildlife movement, transport timing, and the ordinary unpredictability of travel in a large northern landscape.
Pick the scenario that matches your real constraints, not the version of the trip that sounds most impressive in a sentence. That is the safest reasonable default, and it is often the one that produces the better expedition.